In Module 1 of 'Understanding DNA Basics' we discussed the key concepts and theories relating to DNA analysis for genealogy. Before moving to Module 2, make sure you understand the theory of segment triangulation.
The purpose of undertaking these exercises is to consolidate your understanding of the difference between shared matches and shared segments. By using the free tools at GEDmatch you can practice analysing your shared matches to check if you have any shared segments, then to identify triangulated segments with other matches in common. Whilst shared matches are 'CLUES' of a shared ancestor, shared and triangulated segments are 'EVIDENCE' of a common ancestor.

GEDmatch is a third party tool that allows you to do comparisons between people who have tested their DNA at different sites. It's free version has these 3 basic tools that you should start with:
* 'One to many' report
* 'One to one' comparison
* 'People who match both kits, or 1 of 2 kits'.
The Tier 1 subscription has more tools but it is recommended that you start with the free version and master that first.
Suggested activities
The following activities are suggested to help you apply 'Module 1' in practice, these can be done using the GEDmatch 'free' version.
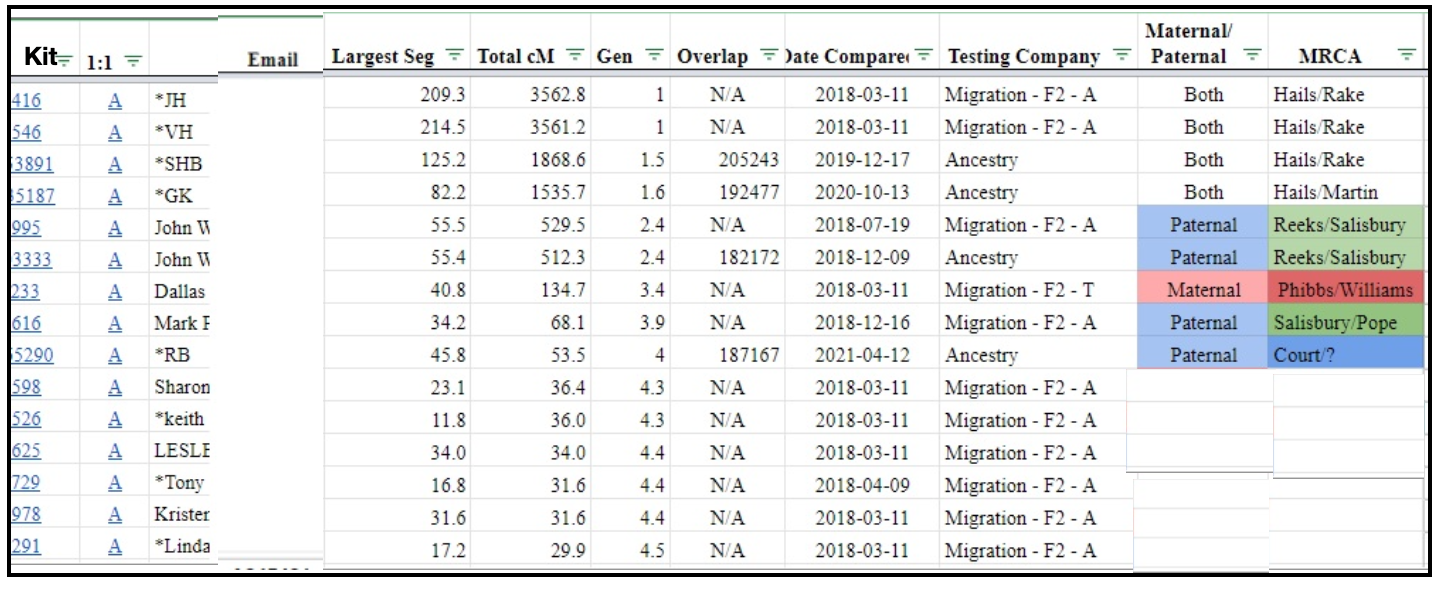
- Run the ‘one to many - limited version’ tool at GEDmatch for your DNA kit, sort by Total cMs shared. Leave the list default at '50 matches', but adjust the match size to 40cMs.
- Copy/Paste (special) to a spreadsheet, add columns for side (eg P, M, Both), MRCA (Most Recent Common Ancestor) and Notes.
- Give your spreadsheet a working title 'Total cMs - Broad approach'.
- Analyse at least your top 10 matches - those with the highest cMs. Do the whole 50 if possible, you will probably have close kits in the list that you already know and some duplicates.
- Do you know if they are maternal or paternal (or both - ie share both sides, close relations) - mark your spreadsheet with the known side (optional - add tags in GEDmatch if you have a Tier 1 subscription). GEDmatch lists the original testing company on the 'one to many' report. If they have tested at another site, like AncestryDNA, you may find more information at the original test site.
- Notate your spreadsheet with the MRCA couple name, if known.
- If you don't know anything about a match in the list, run the ''People who match both kits, or 1 of 2 kits' report between you and the match. See if you share matches with any of your known relatives, this may give an indication on the 'side'.
- If you recognise any matches from AncestryDNA, check the 'sideview' feature and use that as a working theory on side - eg paternal/maternal. If you mark a match based on either of these tools, make sure you add a comment in the notes field.
- Think about the likely relationship (remember the Shared cMs tool to predict relationships) and how far back in your tree you might expect to find the MRCA? The 'Gen' column also gives you an estimate.
- Add any other notes you think might be helpful later. To help spreadsheet manipulation later try to be consistent in how you update your notes field, develop a system.
Exercise 2: Using Chromosome Analysis - GEDmatch www.gedmatch.com
- Do a ‘one to one comparison’ at GEDmatch between yourself and your largest unknown match (from the total cMs list in Exercise 1), to ensure it is a valid match (graphics and positions). Look at the graphics, taking account of the HIR (yellow) and no match (grey) regions. It is unlikely you will have any FIR's (green) unless the match is a close relation, or is related to you on both sides.
- If you have no matching segments, select another match and repeat the 'one to one comparison' step.
- Create a second worksheet (called 'Chromosome Analysis - Targeted approach') to track matches by chromosome. To start - create 3 header columns, Match name, GED_ID and ICW_ID. Add your selected matches name and GED_ID to the 'Chromosome Analysis Targeted approach' spreadsheet.
- Do the ‘one to one comparison’ between yourself and your largest unknown match again, this time using the 'positions only' radio button. Copy and paste the data from the table into the 'Chromosome Analysis - Targeted approach' spreadsheet from column 4. Copy the match name and GED_ID down to any additional rows created by adding the table, this will depend on how many chromosomes you match on.
- We won't need to use all the columns created from the GEDmatch output, but leaving it the same will save you time as you add additional data. Don't worry too much how the spreadsheet looks, you can reformat and hide some of the columns later. If you do reduce it, keep columns for at least the Match_Name, GED_ID, ICW_ID, chromosome number, cMs, start and finish locations and SNP’s. Add additional columns for Side, MRCA and Notes at the end.

- Next you are going to run the ‘People who match both kits, or 1 of 2 kits' report at GEDmatch between you and your match. The people who will appear in this report are 'shared matches' that you and your selected match both share. When running the report, change the second default 'total matching segments' to select matches >20cMs as a starting point - depending on your total number of shared matches you may get too few or too many. You can go back and reduce the threshold down to 10 or 15cMs if necessary, just get a large enough group to be able to practice, ideally about 5-10.
- Do additional ‘one to one comparisons’ between yourself and each of the shared matches (position only).
- Exclude known close relatives for this part of the exercise, as there will be too many shared segments. (Make your own assessment of how many matches you look at, some people will have many matches, others only a few, so change the threshold if needed to reduce the number of shared matches to be more manageable for the exercise).
- Add your name and GED_ID to the 'Chromosome Analysis - Targeted approach' spreadsheet on the next available row. Then add the GEDmatch ID of each of your next shared match under the ICW_ID column. Copy and paste the 'one on one' comparison from the GEDmatch output table to the spreadsheet from Column 4.
- Continue with other shared matches, add the results of all the comparisons to the spreadsheet.
- Sort your 'Chromosome Analysis - Targeted approach' spreadsheet by chromosome, start and end locations.
- Do any matches share on the same segment, in the same location? Colour code each of the individual sets where it appears they have overlapping segments, in slightly different colours.
- Add any 'known' matches with identified shared common ancestors to the MRCA column.

- NOTE: In the output report from‘People who match both kits, or 1 of 2 kits', you may see a tab called 'Save ICW'. This will generate a list of kit ID's, it can be an alternative way to start your spreadsheet. Some users have reported that this button is not visible, if you cannot see it, don't worry it is not essential and the exercise can be completed following the instructions in Part 1.
- Looking at your your 'Chromosome Analysis - Targeted approach' spreadsheet sorted by chromosome, and start and end locations, examine those that appear to be overlapping.
- For those that share on the same chromosome, in the same segment location area, run a one to one between the two matches to see if they triangulate on the same segment area ie. all 3 matches share a common segment location with each other, including you. Expressed another way - A matches B, B matches C, C matches A = triangulation. As you move through the shared match list you may find others that triangulate on that same segment, you will need to ensure that they also match the others in the group. Make a note of this in the notes column.
- Identify the matches requiring additional comparisons - in green shown below.

- On the 'Chromosome Analysis - Targeted approach' spreadsheet add the details of the additional 'one on one' queries making sure you adjust columns 1-4 to correctly reflect who is the subject of each comparison.
- As you add the comparison matches to the spreadsheet, you may wish to add a note to Column 1 why the comparison was made, eg 'Check TG_C02' (check triangulated group, chromosome 2), or the name of the match.
- The next step is to check that these are triangulated segments.

 |
| Chromosome Analysis - Targeted Approach |
 |
| Using 'People who match two kits' as the base spreadsheet |
- What was the total number of shared matches generated by the tool that BOTH you and your largest unknown match shared?
- Of the total shared matches, how many had shared segments on the same chromosome?
- Did some matches share segments on more than one chromosome?
- Of those who had shared segments on the same chromosome, how many had triangulated segments with the other match?
- Did you identify any additional triangulated segments not shared with the initial match?
- Does your match (or shared/triangulated matches) have a pedigree listed on the 'one to many' report - GED/WIKI? By reviewing their tree, can you see how they might relate to you? (It is not necessary to go looking elsewhere for additional information for this exercise, just look at what clues you can see in GEDmatch).
- Make notes of any other information and details of triangulations (some optional ideas for clues include - shared matches, pedigree, surnames, locations).
- Notate your spreadsheet with the MRCA couple, if known (don't worry if you can't tell yet).
- Repeat for other matches of interest (optional).


