Saturday, December 3, 2022

Genealogical Database Tool (GDAT) - Part 3: Genealogical Tools


This post is the third in a series developed to support the Genealogical DNA Analysis Tool (GDAT) User Group at the Society of Australian Genealogists (SAG).  It does not replace the extensive user guide and help video tutorials already developed by the GDAT team.  Members of the User Group should always consult those resources first.

You can access Parts 1 and 2 by clicking the links below, or the user guide for more specific information.

Part 1: Getting Started

Part 2: Genetic Tools 

GDAT User Guide.


After setting up and importing your data, as you work with the genetic tools you will want to explore the genealogical tools GDAT has to offer.  Depending on what data you have imported and from where, will determine the results available in GDAT under each of the tools.  Remember GDAT is a database, using loaded DNA segment and pedigree information.  Be conscious of when your GDAT system can/cannot provide this, it may not be possible for all DNA sources at all times.  Again, be aware that the third party tools for extracting this information are constantly subject to change.  


Maximising the amount of pedigree information for your relatives (matches) within GDAT will greatly increase your success when using the genealogical tools.  Remember that the product allows for additional data to be entered manually, plus you can always import GEDcoms generated from your own research to add pedigree information to a relative.


Tree Completeness and DNA Confirmation

There are two things you need to focus on if you want to be successful in working with the GDAT product to analyse your results using chromosome analysis.  Firstly, you must have built your pedigree out as far as you can - the more complete your tree the more chance you will have of being able to identify shared ancestors with your matches.  Secondly, you must be working on a solid DNA base.  What I mean by that is - not only do you know who your ancestors are out to the second great grandparent level, but your DNA results also confirm them as genetic ancestors.  The segments you share with your close cousins are the foundation of what you need to be able to 'walk back your segments' over time to more distant ancestors.

My aim is to identify and DNA confirm all my ancestors out to 5th great grandparents (254 ancestors).  Chromosome analysis is essential for this exercise because as we go back in time, there is also a much greater chance that we are genetically related to our matches in multiple ways.  These second relationships may well be back much further than we have researched for our own pedigrees or our matches.  Due to the process of recombination past 3rd cousins, we don't always share DNA with all our genealogical cousins.  This does not mean our tree is incorrect, it may just be that the DNA from that ancestor has not survived.  However, in some circumstances our genealogical research may be correct according to the records but there is a genetic mismatch, where DNA reveals the parents may be someone completely different!  Telltale clues for these cases are often that you have no matches on those lines.

I regularly take time to document my progress and monitor my results and this helps me to focus on priority areas.  My progress for my own genealogy can be found on this page.

Before embarking on the resource intensive process of verifying your pedigree past 2nd great grandparents with chromosome analysis make sure you have:
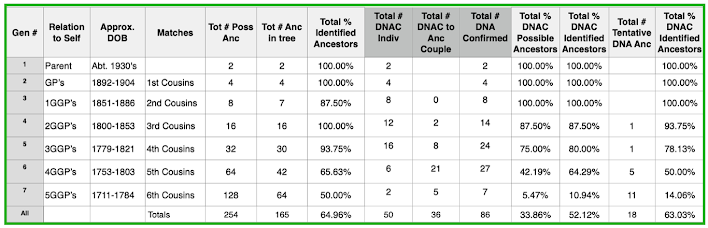
  • identified all your ancestors out to at least the 2nd great grandparent level;
  • identified DNA cousin matches up to 3rd cousins that confirm that your 2nd great grandparents (P1-8 and M1-8) are also your genetic ancestors.  These relationships can be confirmed provided you and your match share the appropriate cMs for the predicted relationship.  Ideally, as many as possible of these close matches should have their results on a chromosome analysis site to enable you to build on these confirmed relationships and 'walk back the segments' to more distant ancestors using GDAT;
  • used your DNA results to identify any unknown ancestors closer than 2nd great grandparents using the total cMs approach, if traditional research techniques have previously been unsuccessful;
  • identified DNA matches for all your lines, with shared ancestors back to each of the 8 sets of ancestral couples at the 2nd great grandparent level.  If not, reconsider whether the ancestors you have identified are actually the right ones?  This will not always be the case, there are many reasons why you might have no matches, but more often than not it may be an indicator that either your research is wrong or the parent of your ancestor may be someone completely different;
  • extended your pedigree out as far as you can - the more complete your tree the greater your chance of success in finding connections with your DNA matches!


Relevant Workspaces and Tools

As you work with the genealogical tools you will be predominately working in the following three GDAT workspaces, accessible from the main menu.  

  1. Relative - views relevant to your DNA matches;
  2. Profile - views relevant to people whose DNA you are monitoring;
  3. MRCA - tools to assist your research.

The function keys in GDAT are very useful for navigation within the database.  The most useful functions for genealogical analysis are:

  • F2 - Relative Ahnentafels.  To maximise your productivity, it is best to load pedigree information for your matches via a 'bulk import' from a third party tool as DNAGedcom.  The F2 function provides the ability to add pedigrees manually via GEDcom import, Pedigree Thief and One2Tree (Windows only), plus you can also update details on existing ahnentafels already loaded to GDAT.   Don't forget you can also upload GEDcoms extracted from your own family history program if you have researched your relatives ancestry, or just fill in the blank page!


  • F3 - Family comparisons.  This screen compares genealogical information between the profile and matches, identifying any common surnames.  Highlighting the surname gives more information about your ancestor, so you can compare them to your matches ancestor list.  If no surnames show for your match but they have an ancestor list, go back to the F2 screen, choose Update, then 'set relative lists to Ahnentafel values' and the missing surnames should populate.


  • F5 - Merging.  There are two main pathways I use for merging duplicate profiles.  If you identify them in the F7 chromosome browser, highlighting the matches then right clicking will lead you to the F5 page.  Or you can access the same F5 page via the Relative Menu.  To complete the merge you need to remember to have the relative information you want to keep on the right.  Tick boxes on the left if you want to retain that information.  Things to keep an eye out for when deciding which relative to choose are - where Ahnentafel value = true, segments or status of MRCA are already assigned or if there are research notes.  Always back up before a merge, so you can revert the database if the merge does not behave how you expected.  In the case of duplicates, select the 'same person' radio button, then merge.  There is also an option to select 'other' - this option can be used for combining relative records for closely related relatives.  Check the user guide for more information.


  • F7 - Analysis Tools.  When reviewing matches in the F7 chromosome browser, highlighting the matches then right clicking will bring up a menu.  The compare ahnentafel groups option will identify any shared ancestror couple names between the highlighted matches.  Similarly, the compare ahnentafel surnames will identify any shared surnames within the match group.  This can assist in finding possible connections between your matches.


The MCRA menu has some great genealogical tools that enable you interrogate the database in different ways and can be very useful in finding more genealogical connections.

  • Segment MRCA's - This tool identifies matches whose status has been set to MRCA and lists them under the name of the MRCA group allocated to individual segments.  It provides a good summary of each of the 'family group' names you have listed in the profile ancestor list (F6) and all your confirmed matches;
  • Groups associated with MRCA's -This tool aims to find you more possible connections to your MRCA.  For each of your family groups, it lists the group names of your identified and confirmed relatives back to the shared ancestors.  Often these can be names little known to you.  Investigating matches with these surnames in their trees can often lead to other descendants from these same ancestor groups.  Because the group name is the same however, it does not always mean they are the same people, you need to do the research to confirm or reject them.   
  • ICW profile group - This tool lists relatives who have the same group names in their tree as the profile person, but have not yet been given the status of MRCA.  These require investigation and can lead to identifying more shared ancestors.  Whilst many of those with common names or listed as Unknown or MNU can be misleading, if you regularly use the MRCA notes field, the process can often bring to light other matches you may have previously investigated that should be revisited.
  • Region clusters - This tool lists places names in common with the profile and their matches.  Group name formatting needs to be consistent so not all your places will be listed if your match describes the place name differently.  Can be useful for identifying matches from particular localities of interest.

There are Ahnentafel Routines under the Preferences menu that can be run to assign group names and locations to maximise the effectiveness of these tools.  Some are quite resource intensive - refer to the user guide for more information.

The GDAT database won't find every connection, at times you will need to do research on your matches trees to find your shared ancestors.  Remember to add new surnames and additional pedigree information to your relatives pages to maximise the effectiveness of the genealogical tools. 


To get help:

* Make sure you first consult the extensive GDAT User Guide;

* Join the Facebook Group for GDAT and search the site to see if the question has been asked before.  If not, ask the question there;

* SAG members can join the 'private' SAG GDAT User Group on Facebook for general collaboration between members.


Remember, as you work with the software:

* Back up regularly (under File);

* Use the available Help resources (under Help);

* If imports or views aren't behaving as you would expect, you probably need to adjust some of the defaults (under Preferences)

* Keep notes, one of the great features of GDAT is being able to easily pick up where you left off last time!


Finally....

GDAT is a complicated product, understanding how to use the product will take time and if you don't understand the principles of chromosome analysis then you will struggle mastering it.  

Follow the 'Research Methodology' and make sure you have a solid 'DNA confirmed' base for your pedigree before you attempt to extend your confirmations past 2nd great grandparents using chromosome analysis.  Genealogical and genetic research go hand in hand, just as we move from the known to the unknown using our traditional paper research methodology, the same applies with genetic research where we need to 'walk back the segment' over time.

If like me, you are looking to confirm your pedigree out to at least your 5th great grandparents then you will amass a great deal of genetic and genealogical data along the way.  I started my genetic journey in 2010 and it's easy to forget some of that early research.  I like to think of GDAT as my 'one stop shop', an easy way to manage all the data and minimise the amount of duplicated research.  What I like most of all is being easily able to pick up where I left off if I haven't looked at a particular part of the family for a period of time.  No research is wasted or lost and continues to build as more clues emerge, after all if you are into DNA chromosome analysis then you are in it for the long haul.

Thanks Becky Walker for providing this fabulous tool!


Veronica Williams
GDAT Group Convenor
2nd December 2022


Saturday, October 29, 2022

Genealogical DNA Analysis Tool (GDAT) - Part 2: Genetic Tools


This post is the second in a series developed to support the Genealogical DNA Analysis Tool (GDAT) User Group at the Society of Australian Genealogists (SAG).  It does not replace the extensive user guide and help video tutorials already developed by the GDAT team.  Members of the User Group should always consult those resources first.

You can access Part 1 by clicking on the link below, or the user guide for more specific information.

* Part 1: Getting Started

GDAT User Guide.


After setting up and importing your data you will want to start exploring the genetic tools within GDAT.  Depending on what data you have imported and from where, will determine the results that will be available in GDAT under each of the tools.  Remember GDAT is a database, using loaded DNA segment and pedigree information.  Whilst it has a triangulation feature, unless you have loaded the relevant ICW and triangulation reports it cannot provide a result.  Be conscious of when your GDAT system can/cannot provide this, it may not be possible for all DNA sources at all times.  Again, be aware that the third party tools for extracting this information are constantly subject to change.


DNA Research Methodology

To get the most out of your DNA results you need to apply the DNA Research Methodology, first published in 2021.  GDAT caters for working on both sides of the DNA Framework:

* Broadly - via Total cMs (F8) and tree triangulation; or

* Specifically - by chromosome (F7) using both segment triangulation and tree triangulation.  It is at the segment level that GDAT provides the most benefit.


Identifying shared ancestors via tree triangulation requires work.  You need to build out your own tree to at least 5th great grandparents, where possible.  In working with your DNA matches you will often need to also need to build out their trees and analyse the results to identify the shared ancestors.

Always work on your largest matches first.  When using the broad approach we focus on shared matches and clusters to identify the common ancestor.  Past 2nd great grandparents we utilise the specific approach using chromosome analysis to identify triangulated segments and groups.  Whether you are working with shared match clusters or triangulated groups, the methodology is the same to identify the common ancestor through tree triangulation. 

When there are no privacy concerns (particularly people who were born over 100 years ago), don't hide all that extra research in private trees - add them to a 'free' one world tree such as Wikitree to assist other researchers.  


Relevant Workspaces and Tools

As you work with the genetic tools you will be predominately working in the following three GDAT workspaces.  When you first start using GDAT it can be difficult to navigate the site and to be clear about the different perspectives you need to apply when working in each of these areas.  

  1. Relative - views relevant to your DNA matches;
  2. Profile - views relevant to people whose DNA you are monitoring;
  3. MRCA - tools to assist your research.
Make sure you know whether you are looking at something from the point of view of your DNA match (Relative) or from the perspective of the DNA Tester whose results you are monitoring (Profile).  

To work effectively, it is also critical that you understand and can apply, chromosome analysis theories when using each tool.  In particular:
  • Overlapping segments;
  • In common with (ICW) on the same segment;
  • Triangulation - what it is and when it shows data on GDAT.

The function keys in GDAT are very useful for navigation within the database.  The most useful functions for genetic analysis are:
  • F8 - Relative List: This page is best for viewing all matches by total cMs.  It also has many useful search and filtering functions; 


  • F1 - Relative Page:  This is where all the data about your DNA match (Relative) is stored.  It has an extensive notes field and quick links to DNA match pages, pedigrees and email;


  • F7 - Chromosome Browser: There is a separate chromosome page for each of the 23 chromosomes for every profile.  This is where you identify matches who may belong to the same shared ancestor group.  It can be sorted and filtered in different ways;


  • F4 - DNA Comparison Page: if you have loaded sufficient data, this is the engine room for your analysis.  You can often make decisions about matches without the need to go back and forth to the DNA testing site, saving research time.


Lastly, the chromosome analysis view is aimed at helping identify gaps and identify areas for further research.  It is most useful when you have been working with GDAT for a while.  When you first start there will be limited information in this view.


To get help:

* Make sure you first consult the extensive GDAT User Guide;

* Join the Facebook Group for GDAT and search the site to see if the question has been asked before.  If not, ask the question there;

* SAG members can join the 'private' SAG GDAT User Group on Facebook for general collaboration between members.


Remember, as you work with the software:

* Back up regularly (under File);

* Use the available Help resources (under Help);

* If imports or views aren't behaving as you would expect, you probably need to adjust some of the defaults (under Preferences)

* Keep notes, one of the great features of GDAT is being able to easily pick up where you left off last time!


Finally....

As we always say, GDAT is a complicated product, but we are dealing with a complicated subject matter.  Understanding how to use the product will take time and if you don't understand the principles of chromosome analysis then you will struggle mastering it.  

Follow the 'Research Methodology'.  Be proficient in applying the broad approach and use that first.  Then move on to the specific approach utilising the more complex chromosome analysis techniques that GDAT is able to manage so well.


Veronica Williams
GDAT Group Convenor
29th October 2022


Saturday, September 24, 2022

Genealogical DNA Analysis Tool (GDAT) - Part 1: Getting started


When I first started undertaking DNA analysis back in 2011, I would often duplicate my effort by revisiting key matches, running queries and would sometimes spend many hours before I realised I had gone down the same rabbit hole, again.  I started many 'master' spreadsheets, often deciding to start again as I kept wanting to view the data in different ways.   Jim Bartlett blogged about his spreadsheet method in 2014 and I once again adapted my process to try and get some order into my data management, but I still had so much other information, email folders, pedigrees and notes in different places.  I was in a mess.  The spreadsheet method suits many but the volume of data can make it unmanageable particularly if you are not used to manipulating large amounts of data.  

I had heard about a database called Genome Mate Pro (GMP) but hadn't been able to use it as it only ran on Windows.  It was developed by Becky Walker and was free!  In 2015 a version that worked on a Mac was released and I started using the product, I've not looked back since.  I was delighted as it gave me order and structure, plus I immediately saw results.  Being specifically built to support DNA analysis it had all the views I wanted.  I was able to capture text and pedigree information and it gave me a 'one stop shop' for storing all my information with the ability to also record my progress with notes and status settings.

Fast forward to today, we now have the new and improved Genealogical DNA Analysis Tool (GDAT)  with separate Windows and Mac versions.  Back in 2011, I was only dealing with data from FamilyTreeDNA and GEDmatch.  In 2022 we have many more testing companies and as a result many more thousands of DNA matches.  I really don't know where I would be without GDAT!  I use it to manage other kits as well as my own and you can see from my latest stats that I now have nearly half a million DNA relatives in my database.  How I could have ever done that in a spreadsheet is beyond me!  Thank you Becky Walker for all you do!!  


Pre requisites

To be able to use the GDAT database you first need to understand the DNA Analysis Framework and the underlying concepts of chromosome analysis.  You must also be computer literate and adept with handling spreadsheets and large amounts of data.

You can find more information about the DNA Framework and chromosome analysis on this page.  If you are unfamiliar with these concepts I suggest you revisit the posts included in the 'DNA Research Framework Modules - Chromosome Analysis' section before attempting to use the GDAT product.


SAG GDAT User Group

This new series of GDAT posts have been developed to support the new user group we are establishing at the Society of Australian Genealogists (SAG) for members using the GDAT product.   It does not replace the extensive user guide and help video tutorials already developed by the GDAT team.  Members of the User Group should always consult those resources first.


To get started:

* Watch the video and undertake all the tasks in the Quick Start Guide (Setting up);

* Read how the developer (Becky) approaches her DNA analysis, recognising the tool allows for multiple variations.


To get help:

* Make sure you first consult the extensive GDAT User Guide;

* Join the Facebook Group for GDAT and search the site to see if the question has been asked before.  If not, ask the question there;

* SAG members can join the 'private' SAG GDAT User Group on Facebook for general collaboration between members.


Remember:

* GDAT is a database

* You need to constantly feed it information

* Without loading the relevant report - it can’t tell you anything

* You need to understand chromosome analysis to be able to use it

* Avoid re-work: before you start, decide how you are going to mark groups, use status settings and standardise notes. 


Site overview

The GDAT site is divided into workspaces, the key areas highlighted in the following chart.  Points 1-6 were the focus of our first meeting as these are needed to get started.  Follow the instructions in the User Guide to set up, including the video tutorials.  


The following are some key things to remember as you work with the software.
  1. File - open, close, back-up, restore.  Back up regularly!
  2. Help - lots of resources, use them;
  3. Preferences - check this area if things aren't behaving as you would expect, you probably need to adjust some of the defaults;
  4. Edit - this is where you set up profiles and activate import templates.  Profiles are people whose DNA results you are tracking.  It is important to ensure you have set up 'match keys' for each DNA source you want to import.  Before you can get any data into the database, you must also tell GDAT the type of imports you will do and activate the relevant templates;
  5. Utilities - alternative way to import gedcom, plus ability to set standard surname and variations;
  6. Import Data - this is where you load DNA data.  Remember to set up your import templates before attempting to import your data files (see 4).
When you first start using GDAT it is best to trial it with one profile and one DNA data source.  When you are comfortable with how the software is working, branch out with more profiles or new data sources.


Before you start analysing and marking segments

Once you have set up your profiles and imported data you have the information you need to start your analysis.  However, before you start reviewing your relative list or chromosome browser views (F8 - total cMs; or F7 - cMs by chromosome), make sure you have also loaded a pedigree for each profile.  

Once the pedigree is loaded, it is important to review your group names and make amendments to the ancestral couple names if needed.  As you mark segments to ancestral groups GDAT has a number of tools that use these MRCA group names, including database interrogation tools, chromosome maps, etc so it's important they are consistent.  These tools will be discussed in more detail in future meetings.

As indicated earlier, the more data you feed into GDAT the more useful it will be to you.  You should focus on importing as many pedigrees for your matches as possible if you want to use the GDAT software to work to its fullest extent.   The following chart may assist in deciding how to import pedigree information for your matches.  DNAGedcom can be extremely slow to generate reports, but the advantage is you can import trees in bulk, whereas most other methods are one at a time.  Be aware that these third party tools can be subject to change.


Not all methods of extracting DNA segment data from the source company are the same.  Some are more time consuming than others.  It may depend on the platform you are using.  Many GDAT users use different approaches, you need to decide what works best for you.  Remember whilst GDAT has a triangulation feature, unless you have loaded the relevant ICW and triangulation data it cannot provide accurate reports. Be conscious of when your GDAT system can/cannot provide this, it may not be possible for all DNA sources at all times.  Again, be aware that the third party tools for extracting this information are constantly subject to change.


The last three workspaces will be the focus of future meetings when the genetic and genealogical tools of the GDAT software will be discussed in more detail.

  1. Relative - views relevant to your DNA matches;
  2. Profile - views relevant to people whose DNA you are monitoring;
  3. MRCA - tools to assist your research.

GDAT is a complicated product, but we are dealing with a complicated subject matter.  It has many benefits in increasing your productively when reviewing your DNA results.  It is of particular benefit when managing multiple kits.  If used regularly it provides a 'one stop shop' and makes it much easier to quickly pick up where you left off.  Don't keep re inventing the wheel, it might be time consuming to start but bear with it.  If you are serious about your analysis and plan to be in it for the long haul it will definitely be worth it!


Veronica Williams
GDAT Group Convenor
23rd September 2022


Other GMP references:

There are some other documents that may be useful when learning about GDAT that were developed for the old GMP system.  Whilst not exactly applicable, many of the concepts are the same.  Most I know about have been collated onto the DNA Sydney blogsite, you can access them via this page.


Tuesday, June 21, 2022

Making the most of your CASSIDY DNA

Whether your oldest CASSIDY ancestor is a male or female, DNA testing can help to identify your ancestral Cassidy line.  However, you may need to apply different DNA analysis techniques before you can confirm your Cassidy pedigree and to be confident of valid connections back to Ireland where most Cassidy's originate.  

There are three DNA tests that might help depending on where your Cassidy sits in your pedigree:

* Autosomal-DNA test at AncestryDNA, Family Tree DNA, My Heritage or 23andMe - for both males and females whose ancestry is expected to be Cassidy on any of their ancestral lines;

* Y-DNA test at Family Tree DNA - for male CASSIDY's whose ancestry is expected to be Cassidy on their paternal line, ie. father, fathers father, fathers paternal grandfather, etc;

* mt-DNA test at Family Tree DNA - for both males and females whose ancestry is expected to be Cassidy on their oldest maternal line ancestor, ie.mother, mothers mother, mothers maternal grandmother, etc.


Is your line DNA confirmed?
Y-DNA tests can be expensive, particularly the best test - the Big-Y.  So before you make an investment in these types of Y-DNA tests, make sure your Cassidy line appears to be DNA confirmed through autosomal testing first.  Approximately 25% of DNA testers find there is a break in their line due to unexpected parentage events, adoptions etc.  

The recommended strategy is:
* Test at AncestryDNA first and ensure you have DNA confirming your Cassidy line up to your 2nd great grandparents.  AncestryDNA is particularly recommended for Americans and Australians due to the large numbers of testers from these countries.  AncestryDNA has the largest database of DNA testers plus many family trees which helps to identify connections.  Try to test all your older relatives who would have Cassidy DNA, male and female;

* Testers at AncestryDNA should upload their results to a chromosome analysis site to achieve the best results, particularly if you wish to confirm your pedigree beyond 2nd great grandparents.  Refer to Leah Larkins DNA Geek blog for instructions;

* If you test at AncestryDNA or 23andMe you can upload your results for free to FTDNA, My Heritage and GEDMatch which will assist in making more connections.  Testing at FTDNA and My Heritage can also enable you to upload to these sites but unfortunately you cannot 'transfer in' to either AncestryDNA or 23andMe;

* Once your Cassidy line is confirmed through autosomal testing, test the oldest male CASSIDY ancestor at FTDNA for their Y-DNA.  STR testing should be at least at the 37 marker level and up to 111 markers (if you can afford it).  The Big Y is even more expensive but will provide details of SNP's which will better position your ancestor in the Haplogroup tree.  Y-DNA testing can confirm ancestry back many thousands of years, much more than autosomal tests and is best for connecting more distant ancestors.


CASSIDY Autosomal (au/at) DNA Testers
Testing your au/at-DNA can be undertaken at a variety of companies including AncestryDNA, My Heritage, FTDNA and 23andMe.  If you have tested your au/at-DNA which includes a Cassidy ancestor you should also:
* Upload your results to FTDNA and join the Cassidy FTDNA Surname project;
* Use the FTDNA advanced matching tool to find other matches in the Cassidy project;
* Upload your results to GEDmatch to connect with testers from other DNA testing companies;
* Join the GEDmatch Ancestors Project to find other matches in the Cassidy project. Under free tools on the GEDmatch homepage, search for Cassidy;
* Use the same file to also upload to My Heritage which is also free - you may as well 'swim in all the ponds';
* Unfortunately you cannot upload results to AncestryDNA and 23andMe, you will need to test there;
* Instructions for downloading from AncestryDNA and uploading to other sites can be found here.


CASSIDY Y-DNA Testers
Y-DNA tests can only be undertaken at FTDNA.  You should test at least 37 markers (up to 111), or do the Big-Y - for best results the most you can afford is recommended.  You should also join projects and add your results to third party tools to maximise your connections and hopefully identify your oldest Cassidy patriarch:
* Use the FTDNA advanced matching tool to find other matches in the Cassidy project;
* Add your results to mitoYDNA project.


CASSIDY mt-DNA Testers
mt-DNA tests can only be undertaken at FTDNA.  If you have tested your mt-DNA which includes a Cassidy ancestor on your maternal line you should also join projects relevant to your mt-DNA haplogroup and add your results to third party tools to maximise your connections and hopefully identify your oldest Cassidy matriarch:
* Join a haplogroup project at FTDNA;
* Add your results to mito mtDNA project.


Communicate with other CASSIDY cousins
* Join the Cassidy Clan;
* Join the Official Cassidy Clan Facebook Group;
* Join the Cassidy Clan DNA Facebook Group.


Increase your chances of connecting with other Cassidy's
* Add your pedigree to a 'One World Tree' - we recommend WikiTree;
* Add your Cassidy's to our 'One Name Study' at Wikitree;
* Add your oldest Cassidy patriarch to our 'Patriarchs' list at Wikitree;
* Add your oldest Cassidy matriarch to our 'Matriarchs' list at Wikitree.


Other information
As part of the recent 2022 Cassidy Clan Gathering in Fermanagh Ireland, I prepared two presentations that are now on You Tube.  I hope you might find of interest, they are both approximately 30 mins each.  The first focuses on the nuts and bolts of DNA testing, what, who and why you should test.  The second focuses on my family and what I have been able to achieve through DNA testing.
Making the most of your Cassidy DNA (can be applied to Britton DNA);

Read more about by family on 'The Genemonkey' blog - Cassidy and Brittons of Fermanagh, Ireland.


More help
If you need help with Wikitree or other aspects in this post, please do not hesitate to contact me via the contact form on this blog, by private message at Wikitree, or email cassidyclandna AT gmail.com.


Wednesday, January 26, 2022

FTM and DNA: Keeping track in your tree: Part 2 - Filters

I like to do all my DNA research in my Family Tree Maker tree (FTM) and then sync to Ancestry.  This tree has become very large as I add potential lines of enquiry for DNA matches I have not yet linked to my own tree.  This series of posts is aimed at methods I employ to keep my DNA research organised and to help make me more productive when navigating my ever growing tree.  They are presented for use in FTM but can be utilised for all family history programmes.  There are 3 parts, this post is Part 2.

My confirmed pedigree is published to Wikitree, a free genealogical site that everyone can access, it provides many links you can send to your DNA matches from your tree.  The advantage of using these is that as it is a 'One World Tree' other researchers are continually adding to your branches and may just link up your match, without you needing to do anything! 

I regularly publish a table outlining my progress, to help keep me motivated. It is important to both:

* grow your tree so you know as many ancestors as possible, ideally out to at least 5th great grandparents (254 ancestors), this is also known as 'tree completeness'.  Try DNA Painter's excellent tool; and

* keep track of where you have 'DNA confirmed' your ancestors and where there are gaps.  Whilst DNA Painter has another tool for this, I believe it is too broad.  The DNA indicator at DNA Painter is a 'one size fits all' and this can lead to incorrect conclusions.  In my process I have 3 levels of DNA confirmation indicators (refer Part 1 - Images post).  This post further elaborates on the 3 indicators including how FTM filters can help you monitor your progress against each and identify priority research areas.


DNA Confirmation Table

The following is an example of my DNA confirmation table, it is regularly updated on my DNA Research Summary at Wikitree.  I have been using table since 2012 following a post by Roberta Estes on her blog DNAeXplained, but have made some changes to its structure over the years.


What data do you need?

When I first started using the DNA confirmation table, the process for each update was very labour intensive and required lots of analysis to double check all my data sources.  At the time, I felt it was useful as it made me refocus but there were certainly better uses of my time.  However, by using FTM filters my productivity in completing the table has been vastly improved.  The filters have also enabled me to periodically review particular areas between major updates of the table, when working on my tree in FTM.

To complete the 'DNA Confirmation Table' you need the following data:

* Total possible ancestors:  This is static depending on how many generations you intend to monitor.  For me it is 254 - out to 5th great grandparents, or 6th cousins.

* Total identified ancestors: In other words 'tree completeness' - of the 254, how many have I identified?  TIP:  Use FTM colour coding to identify your direct line ancestors and their descendants in your tree, I use the 8 available colours for my 8 great grandparents.

* Total direct ancestors - DNA Confirmed to 'individual';

* Total direct ancestors - DNA Confirmed to 'shared couple';

* Total direct ancestors - DNA Tentative: Ancestors where the DNA match relationship is beyond 3rd cousins at AncestryDNA or not yet triangulated at a chromosome analysis site.

Remember you need to undertake chromosome analysis and triangulation to have sufficient evidence to 'DNA confirm' matches >3rd cousins, or where there is no supporting paper trail.  At the recent chromosome analysis course I outlined the considerations for what can be 'DNA confirmed' in Module 1 and Module 4.  


Custom Facts

Before creating smart filters, to enable you to gather the respective data you also need to create additional 'custom facts' in Family Tree Maker that the filter will utiliseThe 3 custom facts I have created are:

* DNA Status (DNA-S) -  For each DNA match I record the testing companies where there data is available, for indirect connections the shared MRCA surnames. If potential shared ancestors (or cousins) are identified from Triangulated Group's (TG) or Cluster research, I use this field to notate 'TG-Ancestor?'.

* DNA Confirmation (DNA-C) - For my direct ancestors I note the confirmation status of either 'confirmed or tentative', at the 'individual or ancestral couple' level.

* Research Tree (RTREE) - This field is used to create notes about why individuals been added to my tree and are unconnected, eg perhaps by the name of the match eg 'Fred Smith research' or detail a triangulated group 'TG: 006: C21-A-VP-P008', or cluster 'MC-5'.  This field can also be useful for common names in the index, I might add something like 'Roberts - by marriage' to help when reviewing the list.  Coloured dots will show in the index for all cousins who are connected in your tree and may share DNA with you (if you followed my earlier suggestion) but many of your non-connected families will require constant review.  As you compare names make notes in this field and avoid revisiting the question many times over.

The following examples show the type of data included in each of these custom facts:


These custom facts can be privatised if you do not wish them to appear on your tree at Ancestry after synchronisation, go to Fact Properties.  In my tree I have 'DNA Status' and 'DNA Confirmation' public but 'Research Tree' private.  Living people remain private at Ancestry regardless of the fact properties status.

For more information on creating FTM Filters, Custom Facts, Colour coding etc refer to the FTM Companion Guide.


Creating smart filters

Step 1. Ancestor filters:

The first step is to create an ancestor filter that captures the required level of ancestors.  For 254 ancestors the filter needs to be created for 7 generations.  You may also need to filter out yourself and your spouse to limit it to your direct line ancestors.  

I have also created a filter to show 'all ancestors' - this can be useful particularly to find them quickly, if you have a large tree, or many similar names.


Step 2. Specific DNA or analysis filters:

I then create additional filters for specific DNA interest areas.  Some examples include:


When creating these specific filters, 'filter in', then select 'all facts' (to find your custom fact) and indicate a value using terms recorded under that specific custom fact.  This will result in limiting the index to just those individuals who meet the specified criteria.  


There are a variety of different ways you can use filters to help with your research, it's up to you and your imagination.  Depending on the filter you are creating 'filter out' can also be useful.


Step 3. Using the data in third party reports:

To complete the DNA Confirmation table I run the following filters, to provide the totals for each column in the confirmation table.

  • Ancestors - 7 gens (column 6 = 165)
  • DNA Confirmed Ancestor (column 8 = 50)
  • DNA Confirmed Couple (column 9 = 36)
  • DNA Tentative (column 13 =18)
Each filter provides a discrete index list that enables you to double check the names that appear and to ensure your table is correct.  It will take time to ensure you have been vigilant in using consistent spellings and have not added any erroneous data in the field the filter is using to collect the data, but once you have standardised your approach all works well.

For a visual representation of your DNA confirmation status, update your tree at DNA Painter, this enables a cross check of your DNA confirmation table.  I use different colours to differentiate between confirmed individuals (green), confirmed couples (light green) and tentative ancestors (orange).  For identified ancestors who have no DNA status I colour code using the same colours as my FTM ancestral lines.


DNA Research Tools

Filters can be a useful way to focus on a specific aspect of research that you may have put aside but want to revisit.  As examples, these are some of my favourites using the same custom facts:-

  • DNA - Unconfirmed Ancestors - This can be created by 'filtering out' those ancestors with confirmed or tentative in the 'DNA Confirmation' fact.  This enables you to focus your research on a limited ancestor list.
  • DNA - Cassidy-Maguire Group - This is an example of a large cluster group, for this group I currently have 75 people who remain unconnected or are a 'hanging branch' in my tree.  Create a filter for the group by 'Filtering in' all descendants of the shared ancestors.  Utilising colour coding for those belonging to the group can also be helpful.
  • TG Ancestor? - I add these words to the 'DNA Status' fact whenever shared ancestors are identified within clusters or triangulated groups as they are potentially clues for how the group might relate to me. 'Filtering in' can create a limited list to review rather than getting lost within the main index.  Utilising colour coding for those belonging to a specific ancestral groups can sometimes identify further clues or patterns.
  • Research: 013 Courtney Paice (dark blue dot) - My naming convention for clusters and TG's start with the ahnentafel number of the likely ancestor.  I add this number in the 'Research Tree' fact to DNA matches and potential shared ancestors identified from shared matches or triangulated groups.  Some clues may come from chromosome 3, others chromosome 6, when working in isolation patterns may be missed.  'Filtering in - 013'  enables everyone in my tree who is a potential clue for that ancestral line (eg Courtney-Paice) to be viewed in the index.  For these types of filters I specify the same colour code as the respective ancestral line, in this example the dark blue dot.


Veronica Williams
26 January 2022


Postscript:  At the SAG FTM User Group on 12 February 2022, I discussed how I use these.  You can view the presentation here.