
I like to do all my DNA research in my Family Tree Maker tree (FTM) and then sync to Ancestry. This tree has become very large as I add potential lines of enquiry for DNA matches I have not yet linked to my own tree. This series of posts is aimed at methods I employ to keep my DNA research organised and to help make me more productive when navigating my ever growing tree. They are presented for use in FTM but can be utilised for all family history programmes. There are 3 parts, this post is Part 2.
- Part 1 - Images
- Part 2 - Filters
- Part 3 - Source Citations
My confirmed pedigree is published to Wikitree, a free genealogical site that everyone can access, it provides many links you can send to your DNA matches from your tree. The advantage of using these is that as it is a 'One World Tree' other researchers are continually adding to your branches and may just link up your match, without you needing to do anything!
I regularly publish a table outlining my progress, to help keep me motivated. It is important to both:
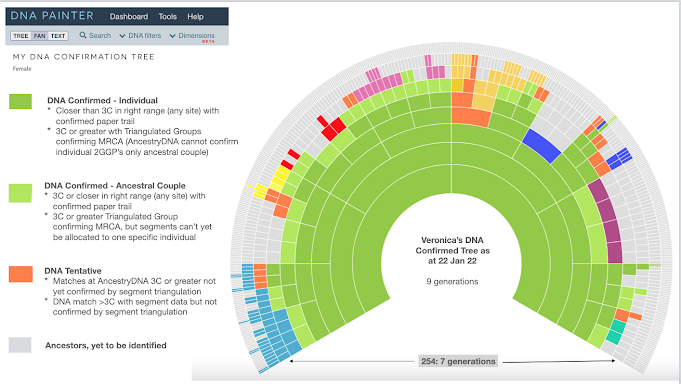
* grow your tree so you know as many ancestors as possible, ideally out to at least 5th great grandparents (254 ancestors), this is also known as 'tree completeness'. Try DNA Painter's excellent tool; and
* keep track of where you have 'DNA confirmed' your ancestors and where there are gaps. Whilst DNA Painter has another tool for this, I believe it is too broad. The DNA indicator at DNA Painter is a 'one size fits all' and this can lead to incorrect conclusions. In my process I have 3 levels of DNA confirmation indicators (refer Part 1 - Images post). This post further elaborates on the 3 indicators including how FTM filters can help you monitor your progress against each and identify priority research areas.
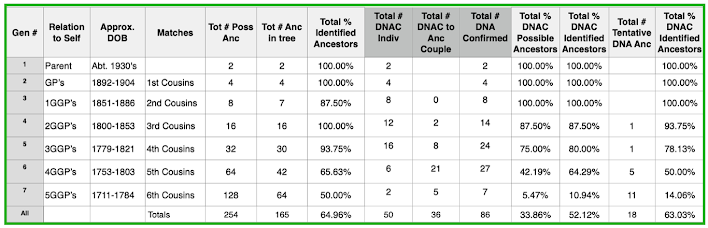
DNA Confirmation Table
The following is an example of my DNA confirmation table, it is regularly updated on my DNA Research Summary at Wikitree. I have been using table since 2012 following a post by Roberta Estes on her blog DNAeXplained, but have made some changes to its structure over the years.
What data do you need?
When I first started using the DNA confirmation table, the process for each update was very labour intensive and required lots of analysis to double check all my data sources. At the time, I felt it was useful as it made me refocus but there were certainly better uses of my time. However, by using FTM filters my productivity in completing the table has been vastly improved. The filters have also enabled me to periodically review particular areas between major updates of the table, when working on my tree in FTM.
To complete the 'DNA Confirmation Table' you need the following data:
* Total possible ancestors: This is static depending on how many generations you intend to monitor. For me it is 254 - out to 5th great grandparents, or 6th cousins.
* Total identified ancestors: In other words 'tree completeness' - of the 254, how many have I identified? TIP: Use FTM colour coding to identify your direct line ancestors and their descendants in your tree, I use the 8 available colours for my 8 great grandparents.
* Total direct ancestors - DNA Confirmed to 'individual';
* Total direct ancestors - DNA Confirmed to 'shared couple';
* Total direct ancestors - DNA Tentative: Ancestors where the DNA match relationship is beyond 3rd cousins at AncestryDNA or not yet triangulated at a chromosome analysis site.
Remember you need to undertake chromosome analysis and triangulation to have sufficient evidence to 'DNA confirm' matches >3rd cousins, or where there is no supporting paper trail. At the recent chromosome analysis course I outlined the considerations for what can be 'DNA confirmed' in Module 1 and Module 4.
Custom Facts
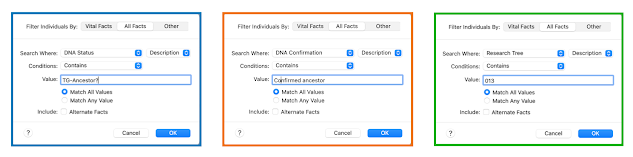
Before creating smart filters, to enable you to gather the respective data you also need to create additional 'custom facts' in Family Tree Maker that the filter will utilise. The 3 custom facts I have created are:
* DNA Status (DNA-S) - For each DNA match I record the testing companies where there data is available, for indirect connections the shared MRCA surnames. If potential shared ancestors (or cousins) are identified from Triangulated Group's (TG) or Cluster research, I use this field to notate 'TG-Ancestor?'.
* DNA Confirmation (DNA-C) - For my direct ancestors I note the confirmation status of either 'confirmed or tentative', at the 'individual or ancestral couple' level.
* Research Tree (RTREE) - This field is used to create notes about why individuals been added to my tree and are unconnected, eg perhaps by the name of the match eg 'Fred Smith research' or detail a triangulated group 'TG: 006: C21-A-VP-P008', or cluster 'MC-5'. This field can also be useful for common names in the index, I might add something like 'Roberts - by marriage' to help when reviewing the list. Coloured dots will show in the index for all cousins who are connected in your tree and may share DNA with you (if you followed my earlier suggestion) but many of your non-connected families will require constant review. As you compare names make notes in this field and avoid revisiting the question many times over.
The following examples show the type of data included in each of these custom facts:

These custom facts can be privatised if you do not wish them to appear on your tree at Ancestry after synchronisation, go to Fact Properties. In my tree I have 'DNA Status' and 'DNA Confirmation' public but 'Research Tree' private. Living people remain private at Ancestry regardless of the fact properties status.
For more information on creating FTM Filters, Custom Facts, Colour coding etc refer to the FTM Companion Guide.
Creating smart filters
Step 1. Ancestor filters:
The first step is to create an ancestor filter that captures the required level of ancestors. For 254 ancestors the filter needs to be created for 7 generations. You may also need to filter out yourself and your spouse to limit it to your direct line ancestors.
I have also created a filter to show 'all ancestors' - this can be useful particularly to find them quickly, if you have a large tree, or many similar names.

Step 2. Specific DNA or analysis filters:
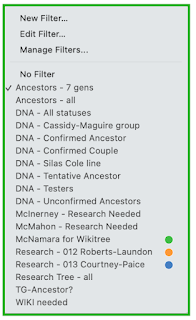
I then create additional filters for specific DNA interest areas. Some examples include:
Step 3. Using the data in third party reports:
To complete the DNA Confirmation table I run the following filters, to provide the totals for each column in the confirmation table.
- Ancestors - 7 gens (column 6 = 165)
- DNA Confirmed Ancestor (column 8 = 50)
- DNA Confirmed Couple (column 9 = 36)
- DNA Tentative (column 13 =18)
For a visual representation of your DNA confirmation status, update your tree at DNA Painter, this enables a cross check of your DNA confirmation table. I use different colours to differentiate between confirmed individuals (green), confirmed couples (light green) and tentative ancestors (orange). For identified ancestors who have no DNA status I colour code using the same colours as my FTM ancestral lines.
DNA Research Tools
Filters can be a useful way to focus on a specific aspect of research that you may have put aside but want to revisit. As examples, these are some of my favourites using the same custom facts:-
- DNA - Unconfirmed Ancestors - This can be created by 'filtering out' those ancestors with confirmed or tentative in the 'DNA Confirmation' fact. This enables you to focus your research on a limited ancestor list.
- DNA - Cassidy-Maguire Group - This is an example of a large cluster group, for this group I currently have 75 people who remain unconnected or are a 'hanging branch' in my tree. Create a filter for the group by 'Filtering in' all descendants of the shared ancestors. Utilising colour coding for those belonging to the group can also be helpful.
- TG Ancestor? - I add these words to the 'DNA Status' fact whenever shared ancestors are identified within clusters or triangulated groups as they are potentially clues for how the group might relate to me. 'Filtering in' can create a limited list to review rather than getting lost within the main index. Utilising colour coding for those belonging to a specific ancestral groups can sometimes identify further clues or patterns.
- Research: 013 Courtney Paice (dark blue dot) - My naming convention for clusters and TG's start with the ahnentafel number of the likely ancestor. I add this number in the 'Research Tree' fact to DNA matches and potential shared ancestors identified from shared matches or triangulated groups. Some clues may come from chromosome 3, others chromosome 6, when working in isolation patterns may be missed. 'Filtering in - 013' enables everyone in my tree who is a potential clue for that ancestral line (eg Courtney-Paice) to be viewed in the index. For these types of filters I specify the same colour code as the respective ancestral line, in this example the dark blue dot.


